Paperboard Sleeve and Tray Fit: Fix Binding Before Production
Quick answer
Check paperboard sleeve and tray fit with the actual packed product and the intended printed board. An empty white sample cannot establish how a varnished sleeve will slide over a loaded tray. Separate the product space inside the tray from the sliding space between tray and sleeve. Then inspect folds, glue seams, rubbing and removal before approving the dieline.
By Hugo He · Custom Packaging Consultant, MTT Packaging · Updated 2026-11-06
Packaging design reference. Final fit, materials and finish are confirmed on an approved sample.
At a glance
Check paperboard sleeve and tray fit with the finished board, folds and loaded product. Diagnose binding, compare clearances and record sample approval.
The product fits inside the tray; the tray fits inside the sleeve. These are different interfaces. Enlarging the sleeve can reduce rubbing without fixing a pouch that is squeezed by the tray walls. Enlarging the tray can solve that squeeze while making the whole assembly harder to slide.
Record the maximum assembled outside width and height of the tray, including turned edges and glued corners. Record the sleeve opening in its assembled state. A flat dieline dimension is not the same measurement. See the internal and external dimension guide if the drawing mixes these references.
02
Read the coffee-pouch layout before choosing a board
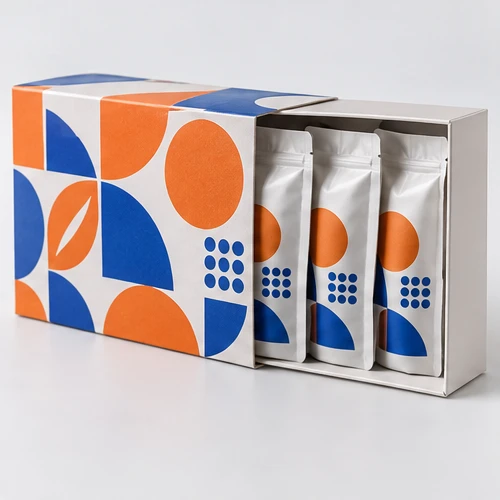
The MTT-C0106 coffee-pouch sleeve and tray shows three sealed pouches side by side. The printed sleeve provides the main graphic surface, while the white tray presents the row as it slides out. Filled pouch thickness, folded seals and the position of the tear notch belong in the sample brief; an empty pouch gives a different envelope.
Ask the packer to load the intended number and orientation. Look for a seal projecting above the tray edge, a bulging pouch spreading the side walls, or a support that catches as the tray enters. Keep each pouch independently sealed. This outer carton layout does not establish a food-contact or freshness specification.
03
A clearance example you can check
Illustrative dimensions, not an MTT production specification: suppose the finished tray measures 100.0 mm across its outside and the sleeve opening measures 101.2 mm inside. Total width clearance is 101.2 − 100.0 = 1.2 mm. If centred, the nominal gap is 0.6 mm per side. That does not account for local seams, bowing or variation between samples.
Measured item
Example
What it establishes
Tray outside width
100.0 mm
The assembled tray envelope, not the product cavity
Sleeve inside width
101.2 mm
The opening available to the tray
Total width difference
1.2 mm
Nominal clearance before local interference
Centred side gap
0.6 mm each
A geometric illustration, not a recommended tolerance
Measure height separately. Record the same dimensions on the loaded sample and across the agreed sample set. Choose the final allowance from those results and the required opening feel, not from this example.
04
Diagnose the place where the tray stops
Observed problem
Check first
Change to trial
Binds immediately at the mouth
Tray corner build-up, sleeve seam and lead-in shape
Review the corner or seam before enlarging every dimension
Moves empty, catches when loaded
Pouch bulge, tin rim or tray base deflection
Revise product support and the loaded envelope
Sticks only at one position
Local glue squeeze-out, a raised flap or damaged edge
Correct the local assembly issue and repeat the slide
Slides but marks the graphics
Contact location and intended coating
Trial the final surface and inspect repeated opening
Falls out when tilted
Opening orientation and intended retention
Review a deliberate stop or closure; do not rely on friction alone
05
Approve the crease and surface together
Holmen’s paperboard creasing guidance explains that controlled creasing creates a folding hinge, and that tool geometry and the board construction affect the result. Fold towards the crease bead. A crease setup must suit the selected board; it is not a universal setting based on grammage alone.
For this sliding structure, review whether the assembled sleeve stays square and whether the tray walls spring outward. Compare the final print and coating on the surfaces that touch. If board or finishing changes after approval, repeat the fit check rather than treating the old white sample as the final reference.
06
Keep a sample record the packer can use
Use one record for the sleeve, tray, support and packed product. Include the board grade and measured thickness, drawing revision, opening direction, seam position, artwork revision and finish. Photograph where any mark or snag occurs. State the agreed opening sequence and acceptance criteria so a smooth empty sample is not approved in place of a loaded one.
A buyer checklist should cover loading, full withdrawal, reinsertion, access to each item, print rubbing and the intended display orientation. Transit validation is a separate complete-pack exercise. A sleeve that opens well on a desk is not proof of parcel protection.

 Bank Transfer
 PayPal