Internal vs External Box Dimensions: How to Measure
Quick answer
Internal box dimensions describe the space inside the assembled box; external dimensions describe its outside envelope. Measure the product separately, including caps and protrusions. Reserve space for the insert and removal, then confirm the closed outer size on a physical sample. Use the finished shipping package for freight measurements. A single length × width × height entry cannot safely stand for all four measurements.
Packaging design reference. Final fit, materials and finish are confirmed on an approved sample.
At a glance
Measure product, internal and external box dimensions correctly. Use a worked clearance example and a sample checklist before requesting custom packaging.
A brief that says “200 × 150 × 70 mm box” leaves the most important question unanswered: measured where? A supplier could interpret it as the internal cavity while a buyer expects the outside to fit a display shelf. Both could follow the stated numbers and still produce an unusable result.
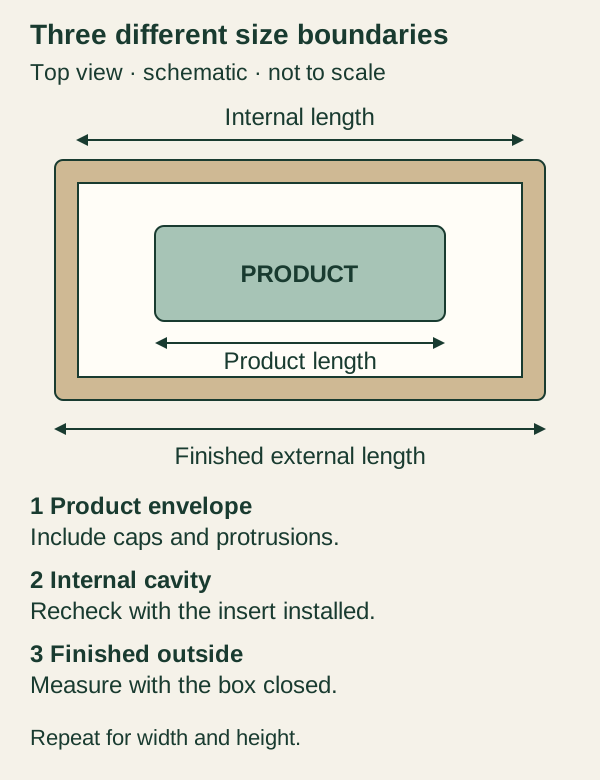
Use these separate records in your drawing or quotation brief:
Four measurements that should not be exchanged
Record
What to measure
Decision it supports
Product envelope
The item in its packed orientation, with cap, pump, label and accessories.
Insert cavity, support points and removal access.
Internal box size
Inside the assembled box; identify whether an insert is installed.
Space available for the complete pack-out.
Finished external size
The closed presentation box, including any projecting closure.
Matching bag, sleeve, shelf and outer-carton fit.
Shipping package size
The final closed transport pack containing the protected product.
Freight quotation and shipping-volume calculations.
A box can have adequate internal dimensions yet leave insufficient usable space after a raised insert is installed. Record the remaining cavity and the distance to the closed lid as separate checks.
02
Agree on length, width, height and orientation
For corrugated structures, the FEFCO Code provides a shared design reference. Its technical description specifies internal measurements in millimetres, in length × width × height order. Identify the opening and match the axes to the chosen style; do not apply a corrugated drawing convention blindly to a bag or a different gift-box structure.
Put L, W and H arrows on a photograph or sketch. State “finished internal size” beside the numbers, and keep the same orientation through the quote, sample drawing and approval record. For a drawer, also mark the withdrawal direction. For a hinged box, identify the hinge side and check that the lid can close over the actual contents.
Measurement locations, not a manufacturing drawing. The usable cavity must be checked again after the insert is fitted.
03
Measure the complete product, not just its main body
Place the product in its intended packing orientation and record its maximum extent along each agreed axis. Include a cap, pump lock, decorative shoulder, base label or projecting handle. A bottle drawing that omits the closure is a poor basis for an insert cavity.
For a set, draw the arrangement first. The outside envelope of several items depends on their positions and the spacing between them; multiplying one bottle’s width by the quantity does not include dividers, pull tabs or finger access. Identify which surfaces may safely carry load and which should remain clear.
If you have several production samples, measure each and record the observed range rather than reporting only the average. That small sample is useful evidence, not proof of a production tolerance. Ask the product supplier for the specified dimensional variation and agree how the packaging will accommodate it. For irregular glass, the guide to inserts for handmade glass explains why one tight cavity can be misleading.
04
Calculate a starting cavity, then test the assumptions
For a simple rectangular product, a planning calculation is:
Planned internal dimension = product dimension + allowance on side A + allowance on side B.
The design workbench uses the same allowance on both sides of each axis in product-size mode. With that simplification, each internal dimension equals the product dimension plus twice the selected allowance. Actual designs can need different allowances at the base, lid and sides.
Illustrative arithmetic only: 5 mm allowance per side
Axis
Product
Calculation
Planned inside size
Length
180 mm
180 + 5 + 5
190 mm
Width
120 mm
120 + 5 + 5
130 mm
Height
50 mm
50 + 5 + 5
60 mm
The 5 mm allowance is an example, not a recommended tolerance or a verified protective cushion. It does not establish an insert wall thickness, compressibility, shock protection or a secure grip. If a raised platform consumes the space beneath the product, or an accessory sits above it, revise the layout rather than treating the tool result as approved engineering.
Enter your own measurements in the packaging design workbench. Choose product-size mode to add an allowance, or internal-box-size mode when the cavity has already been agreed. Keep the result provisional until the product, insert and structure have been reviewed together.
05
Why adding twice the board thickness is not a finished-box formula
Two wall thicknesses can explain the difference between an inside and outside measurement in a simplified straight-wall section. They do not fully describe a wrapped rigid box, a nested lid, a drawer sleeve or folded corrugated corners. Different axes can contain different layer arrangements.
Ask for a section drawing that shows the actual construction. A lift-off lid may extend beyond the base. A drawer needs a sleeve and operating clearance. Wrapped edges and doubled panels can change a local dimension even when the nominal board grade stays the same. Review material and board selection alongside the structure.
For a matching paper bag, measure the closed box in the orientation it will enter the bag. Test the opening, gusset and handles with the complete set. Do not order the bag from the internal box measurements. For an outer carton, repeat the exercise with the intended protective packing and number of presentation boxes.
06
Use the closed transport pack for shipping calculations
Measure the assembled, filled and sealed shipping package rather than the empty presentation box. Check for bulging panels and projecting parts; record the actual packed weight separately. If a pack changes after a drop or compression assessment, remeasure the final approved configuration before fixing freight assumptions.
FedEx’s dimensional-weight guidance explains that shipping charges can depend on the larger of actual and dimensional weight. Apply the measurement, rounding and divisor rules for the chosen service and market; do not assume one online calculator’s settings apply to every shipment.
For a pure volume check, a hypothetical finished parcel of 250 × 180 × 100 mm occupies 0.0045 m³: 0.25 × 0.18 × 0.10. One hundred identical parcels total 0.45 m³ before palletisation or additional consolidation packaging. This is geometric volume, not chargeable weight, a freight quotation or a proven load plan. The box and shipping-volume calculator can support preliminary comparisons; use confirmed external dimensions for the shipping calculation.
07
Approve fit with an assembled sample
Dimensional agreement is only one part of acceptance. A product can fit while the lid presses on its pump, the insert rubs a decorated surface or the customer cannot lift it out. Agree the following checks before approving the sample:
Measurement basis: mark the reference faces, units, internal and external dimensions, and whether the insert is installed.
Usable space: check cavity depth and lid clearance with every item and accessory in place.
Insertion and removal: pack and unpack the actual product without forcing the walls or touching a fragile finish unnecessarily.
Closure: close the lid or drawer normally; check interference, sleeve movement and any projecting ribbon or tab.
Transport pack: assemble the proposed outer protection and agree appropriate testing for the distribution route.
Approval record: retain the drawing revision, measured results, material specification and agreed acceptance limits.
A design allowance is intentional space; a manufacturing tolerance is permitted variation around an agreed dimension. Keep them separate in the specification. A nominal 190 mm cavity with a stated tolerance does not automatically provide enough clearance for a product that also varies. Check the largest permitted product in the smallest permitted cavity before production. The sample approval guide explains the wider approval sequence.
08
Source notes and calculation boundaries
The dimensional terminology above is grounded in the FEFCO Code, 12th edition, technical description. Shipping-weight context comes from the FedEx guidance linked in section 6. Both were checked on 10 October 2026.
The 180 × 120 × 50 mm example is reproducible planning arithmetic and matches the workbench’s current product-size calculation. The parcel-volume example is also hypothetical. Neither is customer data, a tested packaging specification or evidence of savings. The measurement checklist and structure cautions are engineering guidance for the buyer’s review; the final limits must come from the product requirements and approved sample.
From guide to product
Compare packaging for your brief
Explore the opening, material and insert details for each design. These are options to review, not proof of a tested fit for your product.




 Bank Transfer
 PayPal