Void Fill vs Custom Inserts: Which Does Your Pack Need?
Quick answer
Choose void fill vs custom inserts by the movement you need to control. Loose fill occupies spare space; a fitted insert positions a specific product. Neither the material name nor a tidy opening proves transit protection. Check the filled product, contact points, removal access and complete shipping pack before deciding whether you need fill, an insert or both.
By Hugo He · Custom Packaging Consultant, MTT Packaging · Updated 2026-11-07
Packaging design reference. Final fit, materials and finish are confirmed on an approved sample.
At a glance
Compare void fill vs custom inserts for product movement, packing time and presentation. Use a loaded sample checklist before specifying a shipping pack.
A bottle can stand neatly in a compartment and still lift out when the closed box is inverted. A jar can sit firmly on its base while its lid rubs against a neighbouring tube. Before selecting a filler, draw where each item can move: sideways, upwards and towards another item. Mark fragile edges, pumps and decorated surfaces that should not carry the load.
Separate three jobs in the brief: filling unused volume, holding position and cushioning impacts. One component may perform more than one job, but its appearance alone cannot establish that. A rigid divider can separate products without providing the cushioning a fragile item needs.
02
Read the three-compartment layout
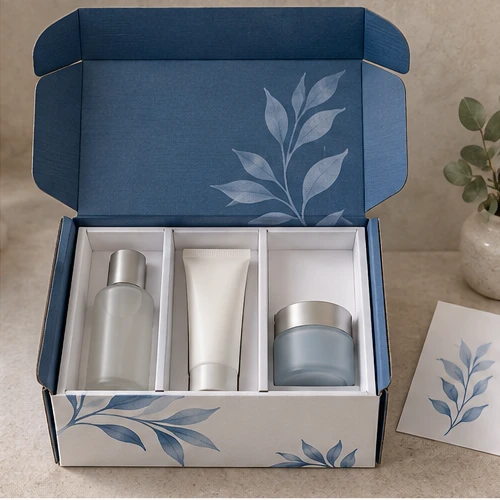
The MTT-E0102 skincare mailer shows a bottle, tube and jar in separate white paperboard compartments beneath a blue printed lid. The compartments give the opening an orderly arrangement. They are a useful starting point for discussing product separation; the image does not show the underside support or prove that the items stay restrained during transport.
For this layout, we would check the filled bottle first: its shoulder and cap need clearance, while support should act on suitable body areas. Next, check whether the tube changes shape when filled and whether the jar can tip into the partition. Ask for the closed-box height with all three items loaded. Adding paper on top could press on a pump or distort the lid instead of solving the restraint problem.
03
Compare the jobs each option can do
Pack requirement
Loose fill or crumpled paper
Fitted insert or divider
Many changing product sizes
Can accommodate different gaps; quantity and placement need a packing instruction
A fixed cavity may require another layout when the product changes
An exact presentation position
Placement can vary between packers and after handling
Defined positions can help; confirm loading and retention in the sample
Separation between items
Material can move away from a contact point
Partitions establish separation; check height, fixing and deflection
Fragile surfaces or glass
Select appropriate cushioning and wrapping for the actual product
A close fit alone is insufficient; check contact pressure and cushioning
Packing and customer removal
Measure dispensing time and cleanup needs
Measure assembly/loading time and provide finger access
Shipping protection
Evaluate the complete closed pack
Evaluate the complete closed pack, including the outer carton
A combined system can make sense: an insert holds a retail set inside its presentation box, while cushioning separates that box from the parcel outer. Specify these as different components so they are not substituted without review. For insert material selection, use the separate EVA and paperboard comparison.
04
Use carrier dimensions only in their stated context
UPS packaging guidance describes tightly crumpled kraft paper as void fill for lightweight, non-fragile items, with at least two inches (about 5 cm) between contents and the outer box. It also warns that loose-fill peanuts are not ideal for flat, narrow products that may move in transit.
FedEx guidance for breakables describes individual wrapping and double-boxing, including three-inch cushioning arrangements. These are carrier packing examples for stated uses, not a universal gap to add to a retail insert. Check the current guidance for your service and product; validate the finished pack separately.
For a luxury gift box travelling inside a parcel, keep the two layers distinct in the drawing. The shipping outer-carton guide covers that outer layer. Here, the decision is how to locate and separate the contents.
05
Measure packout time before comparing unit prices
A low-priced component can still need more handling. Time the complete routine: prepare the box, assemble the insert or dispense the fill, load the items, add paperwork and close the pack. Use the same product mix and the same start and finish points for both trials. Keep any rework separate.
Illustrative arithmetic, not an MTT production result: if one method takes 30 seconds and another takes 45 seconds, a 600-pack batch differs by 600 × 15 ÷ 3,600 = 2.5 labour hours. This calculation excludes breaks, setup, rejects and equipment costs; replace every input with your measured values.
Quotation line
Record for both options
Materials
Outer box, insert or fill, wraps, labels and sealing materials
Preparation
Tooling, assembly and any fill-dispensing equipment
Packing
Measured time per complete pack and rework
Storage and shipping
Delivered component volume and finished parcel dimensions/weight
Validation
Sample iterations and the agreed complete-pack test scope
06
Approve a loaded sample with observable checks
Freeze the contents. Record filled dimensions, weight, accessories and each SKU. A hollow sample bottle is not an equivalent load.
Mark the support points. Show where the insert or cushioning touches the product and where clearance must remain.
Load and remove each item. Check cap clearance, tube seals, finger access and scuffing. Record observations and photographs.
Check the closed assembly. Inspect lid pressure, divider displacement and movement under an agreed safe handling check. This preliminary check does not replace transit testing.
Validate the shipping configuration. Agree a test plan for the actual distribution route with the supplier or test provider. Include the final outer box, closures and all contents.
Keep a packing reference. Record material grades, layout revision, fill placement/quantity and acceptance criteria. Recheck after product or material changes.

 Bank Transfer
 PayPal