How to Choose a Shipping Carton for a Rigid Gift Box
Quick answer
A rigid gift box needs a shipping pack designed around its closed external size, filled weight and distribution route. Choose the outer carton together with the cushioning, surface protection and closure. A close fit alone does not prove transit protection. Check the complete packed product, including the gift box and insert, against agreed functional and cosmetic acceptance criteria before approving the shipping specification.
Packaging design reference. Final fit, materials and finish are confirmed on an approved sample.
At a glance
Plan an outer shipping carton for rigid gift boxes: measure the closed pack, reserve protective space, compare pack-outs and approve a complete shipment sample.
Start with the journey after the gift box is packed
The first decision is whether one gift set travels directly to a customer or several sets travel together to a warehouse. The same presentation box can need different shipping protection on those routes. Record every repacking step: a master carton removed at a fulfilment centre provides no protection for the subsequent individual parcel.
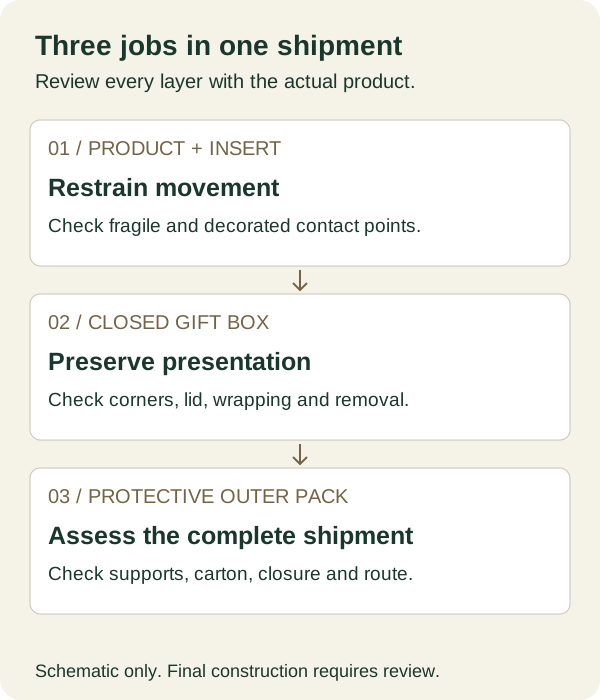
Separate three jobs in the brief. The insert restrains the product; the rigid box presents it and holds the set together; the outer pack accommodates transit protection and shipping labels. None of these jobs should be assumed from a photograph. A bottle can move inside an undamaged gift box, while a secure bottle can arrive inside a scuffed or crushed presentation box.
For a brand selling a gift-ready product, define damage beyond breakage. Torn wrapping paper, a displaced lid, a dented corner or a rubbed foil area may make the set unacceptable even when its contents still work.
Each layer has a different job. Diagram is schematic, not a tested pack-out or manufacturing drawing.
02
Compare the complete pack-out, not just the carton
Outer-pack candidates to evaluate with the actual product
Shipping situation
Candidate to evaluate
Question that decides the design
One gift set sent as a parcel
Corrugated outer with fitted supports or cushioning
Can the supports restrain the closed box without loading delicate corners?
Several sets sent to a warehouse
Master carton with dividers and defined orientation
Can adjacent gift boxes rub, shift or transfer load to one another?
Fragile contents within a gift set
Product restraint plus a reviewed box-in-box protection system
Does the complete system protect both the product and its presentation?
Warehouse repacks into consumer parcels
Separate specifications for bulk delivery and final dispatch
Which protective components remain with the final parcel?
These are design candidates, not approved combinations. Compare carton style, protective material, packed weight and assembly sequence together. For board and structural terminology, use the corrugated mailer and shipping-box specification guide.
03
Size the outer carton from the closed gift box
Measure the finished gift box with the product, insert, sleeve and any ribbon packed as intended. Use its external dimensions, not the internal cavity shown on the gift-box drawing. Also record the usable internal dimensions of the proposed shipping carton. The internal versus external dimensions guide explains how to label those measurements.
Illustrative geometry only: suppose a closed gift box measures 240 × 180 × 80 mm externally. If a proposed protective assembly occupies 80 mm on each of six faces, its nominal envelope becomes (240 + 160) × (180 + 160) × (80 + 160) = 400 × 340 × 240 mm. That envelope is a starting point for reviewing the outer carton’s usable interior, not its external shipping dimensions.
The assumed 80 mm is not a recommendation for your product. The example does not account for assembly variation, folded overlaps, material compression or handling requirements. An outer carton advertised as 400 × 340 × 240 mm externally cannot be treated as having that much usable internal space. Specify measurement basis and fit allowance separately, then check an assembled sample.
FedEx’s US breakables guidance advises double-boxing fragile items with 3 inches of cushioning in and around the inner box. That carrier guidance is a useful reference for its stated context; it does not establish a universal clearance for every rigid gift box or prove the performance of a particular cushioning material.
04
Protect the finish without trapping the box badly
A protective layer must be compatible with the surface it touches. Ask the sample team to check abrasion, transfer, impressions and removal on the actual wrapping paper and finish. A material that feels soft by hand can still press a seam or leave a visible contact pattern. Do not approve a wrap solely from its colour or apparent thickness.
Locate supports where the gift box can carry load. Avoid concentrating pressure on a projecting lid edge, ribbon pull, window or decorative attachment. If the box has a magnetic flap or separate lid, check whether movement can open it during the chosen test sequence. Any retaining sleeve or removable band must also be reviewed for marks and customer removal.
Loose filling and fitted supports create different packing tasks. Loose material needs a repeatable quantity and placement method; fitted components need the correct orientation and compatible dimensions. Compare these practical requirements alongside the options in the packaging material selection guide. Changing the material after sample approval changes the pack-out and calls for review.
05
Give the packing team an assembly specification
An outer-carton drawing cannot tell an operator how to pack the gift set. Supply an illustrated sequence showing the lower protection, box orientation, side components, upper protection and closure. State component references and quantities. For multiple sets, show the arrangement and dividers rather than leaving the operator to choose how many fit.
Check whether the top flaps close normally. Forcing them down can preload the presentation box or distort the outer carton; adding unnecessary empty space can allow movement. Measure and weigh the final sealed package before requesting a freight estimate. Neither gift-box dimensions nor the hypothetical cavity calculation above represent a finished parcel measurement.
Keep the shipping label and sealing method on the outer pack. FedEx’s breakables guide illustrates an H-taping method for a standard corrugated box. Confirm the closure appropriate to your selected structure and service rather than applying that detail unchanged to every mailer style.
06
Agree what the transit assessment must demonstrate
Test the product and its complete proposed packaging together. An empty outer carton or an unfilled gift box leaves important failure modes unexamined. Use the intended insert, wrapping, protective components and closure; identify any substitutions in the report.
Agree the acceptance criteria before testing: product function and breakage, insert retention, closure behaviour and visible gift-box condition. Record photographs and findings after the specified sequence. A pass for an agreed sample and test does not guarantee damage-free delivery across all routes or later material changes.
07
Buyer checklist before approving the outer pack
Route: direct parcel, warehouse delivery or both, including who repacks the order.
Measurements: closed gift-box external size, outer-carton usable interior and sealed parcel external size, each labelled separately.
Mass and arrangement: filled weight, units per carton, orientation and any permitted assortment changes.
Protection: component materials, dimensions, placement and the surfaces they contact.
Packing method: a repeatable illustrated assembly and closure sequence.
Acceptance: agreed product and appearance criteria, with the selected test scope and sample revision.
Use the gift-box design workbench to organise the presentation-box brief, then attach the separate shipping-pack requirements. Follow the sample approval process before releasing the production specification.
Official sources were checked on 12 October 2026. The numerical example is hypothetical planning arithmetic, not an MTT customer case, a transit-test result or a promised damage reduction. The remaining design checks are conditional engineering guidance for the buyer and sample team.
From guide to product
Compare packaging for your brief
Explore the opening, material and insert details for each design. These are options to review, not proof of a tested fit for your product.




 Bank Transfer
 PayPal