Round Rigid Tube Box Packaging: Diameter, Lids and Fit
Quick answer
Specify round rigid tube box packaging with finished internal diameter and usable height, then check the product, insert and lid together. The outside diameter is a separate measurement used for display and shipping layout. A round gift box can hold a sealed jar, but its decorative paper structure does not replace the jar’s closure or establish transit protection.
By Hugo He · Custom Packaging Consultant, MTT Packaging · Updated 2026-11-07
Packaging design reference. Final fit, materials and finish are confirmed on an approved sample.
At a glance
Specify round rigid tube box packaging around the filled product. Check inner diameter, lid engagement, insert access and shipping-carton layout before sampling.
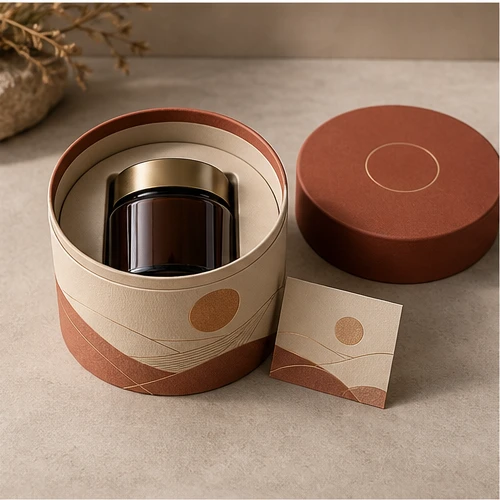
A short round lift-off gift box and a composite paper can may share a circular outline, but their closures and intended jobs can be different. The MTT-R0309 round jar gift box is a paper-wrapped rigid presentation structure around a separate jar. Its removable lid provides the opening experience.
For comparison, Sonoco’s paper-container description identifies a wound paperboard body, an engineered top closure and a metal bottom. That is a different container system. Specify whether you need a decorative outer box or a container that directly holds the contents before discussing materials or artwork.
02
Read the jar layout before selecting the diameter
The burgundy and cream MTT-R0309 image shows a glass jar within a circular insert opening, with the round lid placed beside the base. It gives a clear starting point for the colour and presentation. It does not reveal the jar’s measured size, the insert’s underside or the fitted lid clearance.
Measure the jar with its final lid, labels and any projecting parts fitted. Check the largest diameter at more than one height: a screw cap can be wider than the glass body. The insert may support the body while the box opening must still admit the cap. Leave a deliberate way to lift out the jar without pulling on its closure or scraping its decoration.
A taller tube introduces a different removal problem: the product may sit below the rim. Review finger access, an approved lifting feature or a shallower support arrangement with the loaded sample. Do not add a pull ribbon to the drawing without checking where it is anchored and how the product behaves when lifted.
03
Keep four dimensions separate
Dimension
Measure on the assembled sample
Why it matters
Finished inner diameter
Inside the lined body, including local seams
Available space for the product or insert
Usable internal height
From the support surface to the closed lid’s lowest internal point
Product clearance after the insert is installed
Maximum outside diameter
Across the widest closed part, including the lid
Carton cells, retail placement and packing layout
Lid engagement
The length of contact between lid and body or shoulder
Opening behaviour and retention; it is not product height
Illustrative geometry, not a production tolerance: a 100 mm product inside a 104 mm cavity has 4 mm total diametral difference, or 2 mm on each side when centred. If a liner reduces the measured opening to 102 mm, that nominal side gap becomes 1 mm. Neither result decides whether the product is adequately supported. Confirm the final cavity, support material and removal method in the sample.
Record measurements in two perpendicular directions at the opening and at relevant depths to check for an out-of-round shape. Use the agreed measurement method consistently. For the wider terminology, see internal and external packaging dimensions.
04
Diagnose lid fit before changing the whole box
Mark where the lid starts to resist. A local seam, turned-in wrap edge or insert that spreads the body can produce a different problem from an overall diameter mismatch. Compare an empty box with the intended loaded box, then check the same locations again.
Observation
First checks
Lid catches at one angle
Local seam build-up, roundness and rim damage
Lid fits empty but binds loaded
Insert pressure, jar projection and body distortion
Lid closes but touches the jar cap
Usable height, insert base thickness and internal lid construction
Lid is hard to remove after storage
Sample conditioning, finish at the contact surfaces and dimensional change
Graphics rub during opening
Contact path, cured finish and lid engagement length
Holmen’s paperboard guidance notes that surrounding moisture can change sheet shape through curl or twist. That supports recording storage and conditioning when comparing paper-based samples; it does not supply a tolerance for this assembled box. Agree those conditions and acceptance criteria with the manufacturer.
The two-piece lid-fit guide explains additional opening checks. Keep the round structure’s diameter and seam measurements in its own approval record.
05
Lay out the closed round boxes in the shipping carton
Start with the maximum closed outside diameter, not the insert cavity. For a simple rectangular arrangement, multiply that diameter by the number of positions across each direction, then allow for partitions, cushioning and loading clearance. Specify the carton from the complete pack rather than rounding a product dimension up.
Illustrative layout: six boxes with a 110 mm maximum outside diameter, arranged three by two, occupy a 330 × 220 mm rectangular envelope before any separation or clearance. This is not a carton specification or a freight quote. The lid may be the widest part; measuring only the base would understate the layout.
Trial whether the round boxes can roll, rub at the circumference or lift within the carton. A staggered arrangement may change the footprint, but it also changes dividers and loading. Compare actual assembled alternatives before claiming a volume saving. Review the complete outer-carton plan for the transport layer.
06
Approve the reference set and the finished artwork together
The sample brief should include the filled jar or tin, its dimensional range, quantity, opening preference, wrap and lining materials, insert drawing and print revision. Mark the vertical artwork seam so a logo or fine border does not land unexpectedly across it. Check the physical sample’s wrap join, lid-to-body alignment, base seating and removal sequence under the intended finish.
Record the product, cavity and maximum closed-box dimensions separately.
Check empty and loaded lid fit, then repeat after agreed conditioning.
Inspect the product after removal for pressure marks and scuffing.
Approve an agreed sample set, not only the best-looking single box.
Confirm the complete shipping pack and its validation scope separately.


 Bank Transfer
 PayPal